Publish Model and Deployment
This chapter will introduce how to export and deploy models trained with MMPose. It includes the following sections:
Model Simplification
Deployment with MMDeploy
Introduction to MMDeploy
Supported Models
Installation
Model Conversion
How to Find the Deployment Configuration File for an MMPose Model
RTMPose Model Export Example
ONNX
TensorRT
Advanced Settings
Model Profiling
Accuracy Validation
Publish Model
By default, the checkpoint file saved during MMPose training contains all the information about the model, including the model structure, weights, optimizer states, etc. This information is redundant for model deployment. Therefore, we need to simplify the model. The simplified .pth file can even be less than half the size of the original.
MMPose provides the tools/misc/publish_model.py script for model simplification, which can be used as follows:
python tools/misc/publish_model.py ${IN_FILE} ${OUT_FILE}
For example:
python tools/misc/publish_model.py ./epoch_10.pth ./epoch_10_publish.pth
The script will automatically simplify the model, save the simplified model to the specified path, and add a timestamp to the filename, for example, ./epoch_10_publish-21815b2c_20230726.pth.
Deployment with MMDeploy
Introduction to MMDeploy
MMDeploy is the OpenMMLab model deployment toolbox, providing a unified deployment experience for various algorithm libraries. With MMDeploy, developers can easily generate SDKs tailored to specific hardware from MMPose, saving a lot of adaptation time.
You can directly download SDK versions of models (ONNX, TensorRT, ncnn, etc.) from the OpenMMLab Deploee.
We also support Online Model Conversion, so you don’t need to install MMDeploy locally.
For more information and usage guidelines, see the MMDeploy documentation.
Supported Models
| Model | Task | ONNX Runtime | TensorRT | ncnn | PPLNN | OpenVINO | CoreML | TorchScript |
|---|---|---|---|---|---|---|---|---|
| HRNet | PoseDetection | Y | Y | Y | N | Y | Y | Y |
| MSPN | PoseDetection | Y | Y | Y | N | Y | Y | Y |
| LiteHRNet | PoseDetection | Y | Y | Y | N | Y | Y | Y |
| Hourglass | PoseDetection | Y | Y | Y | N | Y | Y | Y |
| SimCC | PoseDetection | Y | Y | Y | N | Y | Y | Y |
| RTMPose | PoseDetection | Y | Y | Y | N | Y | Y | Y |
| YoloX-Pose | PoseDetection | Y | Y | N | N | Y | Y | Y |
Installation
Before starting the deployment, you need to make sure that MMPose, MMDetection, and MMDeploy are correctly installed. Please follow the installation instructions below:
Depending on the backend you choose for deployment, some backends require compilation of custom operators supported by MMDeploy. Please refer to the corresponding documentation to ensure that the environment is set up correctly:
Model Conversion
After completing the installation, you can start model deployment. You can use the provided tools/deploy.py script in MMDeploy to easily convert MMPose models to different deployment backends.
Here’s how you can use it:
python ./tools/deploy.py \
    ${DEPLOY_CFG_PATH} \
    ${MODEL_CFG_PATH} \
    ${MODEL_CHECKPOINT_PATH} \
    ${INPUT_IMG} \
    --test-img ${TEST_IMG} \
    --work-dir ${WORK_DIR} \
    --calib-dataset-cfg ${CALIB_DATA_CFG} \
    --device ${DEVICE} \
    --log-level INFO \
    --show \
    --dump-info
Parameter descriptions:
deploy_cfg: Deployment configuration specific to mmdeploy, including inference framework type, quantization, and whether the input shape is dynamic or static. The configuration files may have reference relationships, andconfigs/mmpose/pose-detection_simcc_onnxruntime_dynamic.pyis an example.model_cfg: Model configuration specific to the mm algorithm library, e.g.,mmpose/configs/body_2d_keypoint/rtmpose/coco/rtmpose-m_8xb256-420e_aic-coco-256x192.py, independent of mmdeploy path.checkpoint: Path to the torch model. It can be a local file path or a download link (e.g.,http/https).img: Path to the test image or point cloud file used for model conversion.--test-img: Path to the image file used to test the model. Default is set toNone.--work-dir: Working directory to save logs and model files.--calib-dataset-cfg: This parameter only takes effect inint8mode and is used for the calibration dataset configuration file. If not provided inint8mode, the script will automatically use the ‘val’ dataset from the model configuration file for calibration.--device: Device used for model conversion. Default iscpu, but for trt, you can usecuda:0, for example.--log-level: Set the log level, with options including ‘CRITICAL’, ‘FATAL’, ‘ERROR’, ‘WARN’, ‘WARNING’, ‘INFO’, ‘DEBUG’, and ‘NOTSET’. Default isINFO.--show: Whether to display the detection results.--dump-info: Whether to output SDK information.
How to Find the Deployment Configuration File for an MMPose Model
All deployment configuration files related to MMPose are stored in the configs/mmpose/ directory.
The naming convention for deployment configuration files is
{Task}_{Algorithm}_{Backend}_{Dynamic/Static}_{Input Size}.
RTMPose Model Export Example
In this section, we demonstrate how to export the RTMPose model in ONNX and TensorRT formats. For more information, refer to the MMDeploy documentation.
ONNX Configuration
TensorRT Configuration
More
| Backend | Config |
|---|---|
| ncnn-fp16 | pose-detection_simcc_ncnn-fp16_static-256x192.py |
| CoreML | pose-detection_simcc_coreml_static-256x192.py |
| OpenVINO | pose-detection_simcc_openvino_static-256x192.py |
| RKNN | pose-detection_simcc_rknn-fp16_static-256x192.py |
If you need to modify the deployment configuration, please refer to the MMDeploy config tutorial.
The file structure used in this tutorial is as follows:
|----mmdeploy
|----mmpose
ONNX
Run the following command:
# Go to the mmdeploy directory
cd ${PATH_TO_MMDEPLOY}

# Convert RTMPose
# The input model path can be a local path or a download link.
python tools/deploy.py \
    configs/mmpose/pose-detection_simcc_onnxruntime_dynamic.py \
    ../mmpose/projects/rtmpose/rtmpose/body_2d_keypoint/rtmpose-m_8xb256-420e_coco-256x192.py \
    https://download.openmmlab.com/mmpose/v1/projects/rtmposev1/rtmpose-m_simcc-aic-coco_pt-aic-coco_420e-256x192-63eb25f7_20230126.pth \
    demo/resources/human-pose.jpg \
    --work-dir rtmpose-ort/rtmpose-m \
    --device cpu \
    --show \
    --dump-info   # Export SDK info
The default exported model file is {work-dir}/end2end.onnx
TensorRT
Run the following command:
# Go to the mmdeploy directory
cd ${PATH_TO_MMDEPLOY}

# Convert RTMPose
# The input model path can be a local path or a download link.
python tools/deploy.py \
    configs/mmpose/pose-detection_simcc_tensorrt_dynamic-256x192.py \
    ../mmpose/projects/rtmpose/rtmpose/body_2d_keypoint/rtmpose-m_8xb256-420e_coco-256x192.py \
    https://download.openmmlab.com/mmpose/v1/projects/rtmposev1/rtmpose-m_simcc-aic-coco_pt-aic-coco_420e-256x192-63eb25f7_20230126.pth \
    demo/resources/human-pose.jpg \
    --work-dir rtmpose-trt/rtmpose-m \
    --device cuda:0 \
    --show \
    --dump-info   # Export SDK info
The default exported model file is {work-dir}/end2end.engine
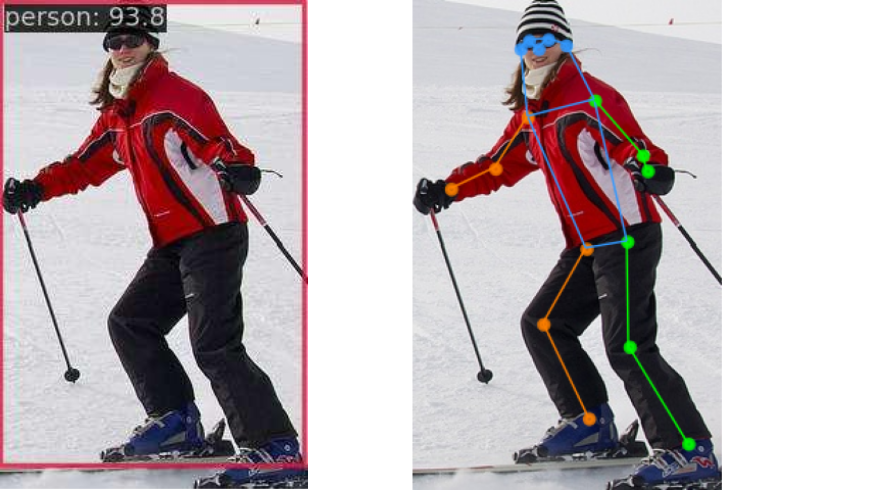
If the model is successfully exported, you will see the detection results on the sample image:
Advanced Settings
If you want to use TensorRT-FP16, you can enable it by modifying the following MMDeploy configuration:
# in MMDeploy config
backend_config = dict(
    type='tensorrt',
    common_config=dict(
        fp16_mode=True  # Enable FP16
    ))
Model Profiling
If you want to test the inference speed of the model in the deployment framework, MMDeploy provides a convenient script called tools/profiler.py.
You need to prepare a folder containing test images named ./test_images, and the profiler will randomly extract images from this directory for model profiling.
# Go to the mmdeploy directory
cd ${PATH_TO_MMDEPLOY}

python tools/profiler.py \
    configs/mmpose/pose-detection_simcc_onnxruntime_dynamic.py \
    ../mmpose/projects/rtmpose/rtmpose/body_2d_keypoint/rtmpose-m_8xb256-420e_coco-256x192.py \
    ../test_images \
    --model {WORK_DIR}/end2end.onnx \
    --shape 256x192 \
    --device cpu \
    --warmup 50 \
    --num-iter 200
The profiling results will be displayed as follows:
01/30 15:06:35 - mmengine - INFO - [onnxruntime]-70 times per count: 8.73 ms, 114.50 FPS
01/30 15:06:36 - mmengine - INFO - [onnxruntime]-90 times per count: 9.05 ms, 110.48 FPS
01/30 15:06:37 - mmengine - INFO - [onnxruntime]-110 times per count: 9.87 ms, 101.32 FPS
01/30 15:06:37 - mmengine - INFO - [onnxruntime]-130 times per count: 9.99 ms, 100.10 FPS
01/30 15:06:38 - mmengine - INFO - [onnxruntime]-150 times per count: 10.39 ms, 96.29 FPS
01/30 15:06:39 - mmengine - INFO - [onnxruntime]-170 times per count: 10.77 ms, 92.86 FPS
01/30 15:06:40 - mmengine - INFO - [onnxruntime]-190 times per count: 10.98 ms, 91.05 FPS
01/30 15:06:40 - mmengine - INFO - [onnxruntime]-210 times per count: 11.19 ms, 89.33 FPS
01/30 15:06:41 - mmengine - INFO - [onnxruntime]-230 times per count: 11.16 ms, 89.58 FPS
01/30 15:06:42 - mmengine - INFO - [onnxruntime]-250 times per count: 11.06 ms, 90.41 FPS
----- Settings:
+------------+---------+
| batch size |    1    |
|   shape    | 256x192 |
| iterations |   200   |
|   warmup   |    50   |
+------------+---------+
----- Results:
+--------+------------+---------+
| Stats  | Latency/ms |   FPS   |
+--------+------------+---------+
|  Mean  |   11.060   |  90.412 |
| Median |   11.852   |  84.375 |
|  Min   |   7.812    | 128.007 |
|  Max   |   13.690   |  73.044 |
+--------+------------+---------+
Note
If you want to learn more about profiler and its more parameter settings and functionality, you can refer to the Profiler documentation.
Model Accuracy Testing
If you want to test the inference accuracy of the model in the deployment framework, MMDeploy provides a convenient script called tools/test.py.
# Go to the mmdeploy directory
cd ${PATH_TO_MMDEPLOY}

python tools/test.py \
    configs/mmpose/pose-detection_simcc_onnxruntime_dynamic.py \
    ./mmpose/projects/rtmpose/rtmpose/body_2d_keypoint/rtmpose-m_8xb256-420e_coco-256x192.py \
    --model {PATH_TO_MODEL}/rtmpose_m.pth \
    --device cpu
Note
For more detailed content, please refer to the MMDeploy documentation.
With this, you have covered the steps for model simplification and deployment using MMDeploy for MMPose models. It includes converting models to different formats (ONNX, TensorRT, etc.), testing inference speed, and accuracy in the deployment framework.